
Tuesday, 27 March 2012
Strawberry Chic: Cake Pops - Spring Flowers
Strawberry Chic: Cake Pops - Spring Flowers: The other day I decided to create my own spring inspired cake pops, seeing how Easter is only a few weeks away. If you are feeling ...
Monday, 7 November 2011
How time flies!
 I cannot believe how the last month has flown by! I have not added to my blog for a long while but I have been busy with my cakepops and at least I now have some great new recipes and themes to add. I will be some of my favourites later this week .........
Friday, 19 August 2011
Pie Pops!
I am always so inspired by the amazing blogs out there and how many goodies I want to try! There just doesn't seem to be enough time in the day anymore! I have yet to try these myself but could not resist re-posting them from famous blogger Bakerella.
What an awesome idea! You want to eat pie without the guilt and try different flavours without having a big slice....perfect reasons to make pie pops!

I am reblogging the recipe from the following link - Bakerella - Easy as Pie and some of the amazing photographs from the recipe on this link - Luxirare.com - Pie Pops. Please go and check them out. You'll love them!


 Have fun!
What an awesome idea! You want to eat pie without the guilt and try different flavours without having a big slice....perfect reasons to make pie pops!
Bakerella's Pie Pops
The Pie Pops really are easy. And if you have a little one around, you don’t even have to lift a finger. They can do all the work and tell you how to make them, too.
The following commentary is from my sweet “little miss bakerella.” She talked and I typed. So here goes… instructions in italics from an eight year old.
I’m getting ready to show you how to make your very own pie pops. They’re not made from candy, but they’re made out of dough. It’s gonna be a baketastic time!
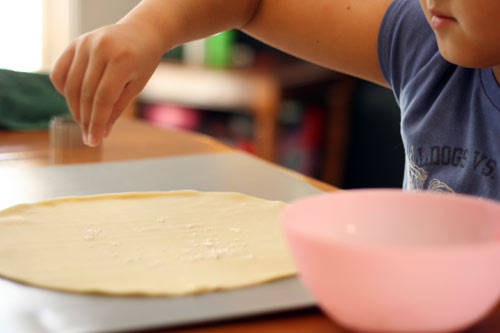
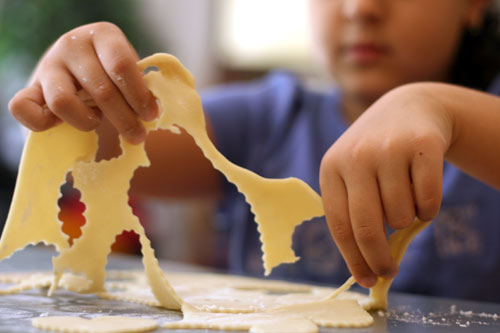
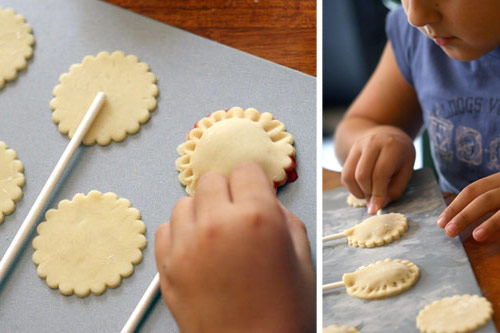
Sprinkle a pinch of flour onto the dough.
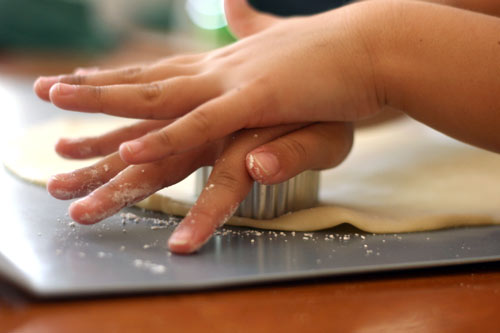
Now we flop it onto the other side and do the cookie cutters.
ME: Dusting with a little bit of flour on both sides will make the dough easier to work with and move around.
Now we do the first cookie cutter. It feels great to do the first one.
There’s a lot more to be done, but still, it’s worth it.
There’s a lot more to be done, but still, it’s worth it.
I’m trying to get close to the other hearts because it will give us more space for the cookie cutters.
ME: If you’re careful you can get enough for 8-9 pie pops from a 9-inch pie crust.
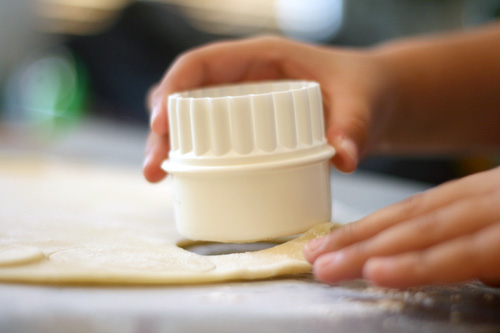
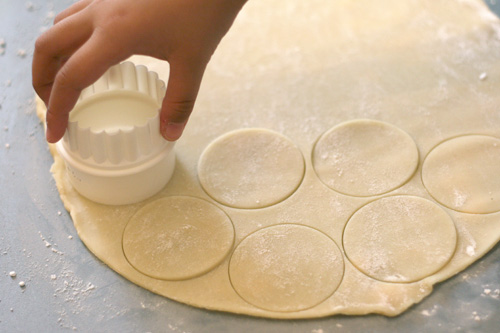
It’s time for the circles . Remember, I’m doing the same thing except it will be easier.
ME: The circle shapes are easier to assemble than the heart shapes because they give you more room in the center for the filling.
This is gonna be all circles here.
Time to get off the scraps. We don’t want those Nuh-uh! You can use the scraps for a different piece of dough.
ME: What she means is… you can save the dough scraps. Roll flat and re-use.
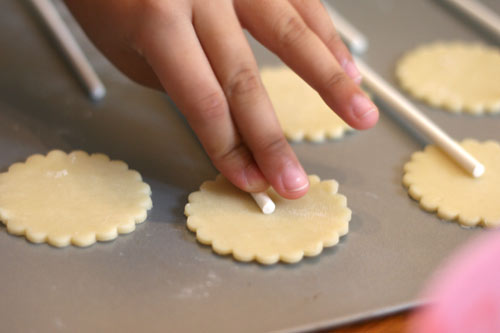
Now it’s time for pressing down the lollipop sticks .
.
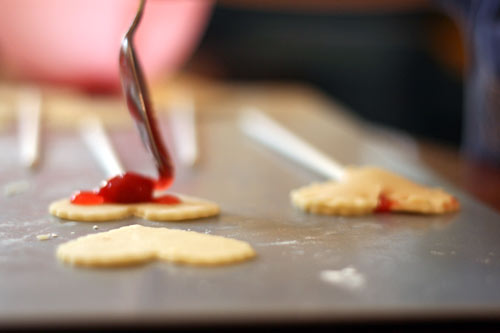
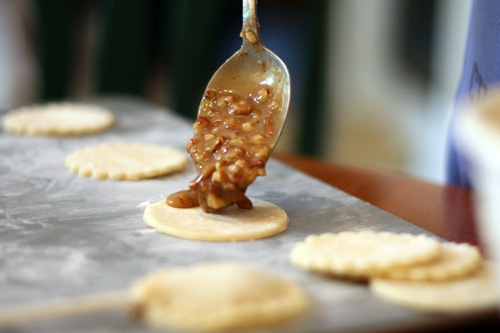
Now, get only one cherry and a little bit of juice. Put it right in the center or it will squeeze out way too much.
ME: pie filling = juice :)
Ummm… as I said before, don’t put too much juice or it will squeeze out because you got to press down or it won’t bake very good in the oven.
ME: We used rolled pie crusts and canned cherry pie filling to play with these. Easy and fun for both of us.
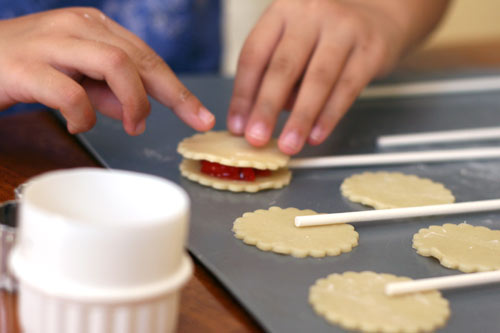
It’s time for sealing it. What you do is, you break a lollipop stick into a small piece and you press it down all around it. (But not too hard.)
ME: Using a short piece of lollipop stick helps you not to mess up the neighboring pie pops when you seal the two pieces of dough together.
Now you take a baking brush and you crack an egg. Don’t put the egg yolk in. Put the egg whites in a little bowl. Get the brush and put some of the egg whites on it. Now brush it onto the front of the dough.
ME: Brush the tops of the pies with egg whites.
Now we got some pistachios and we put it onto the dough, instead of cherry. But I must say, it was mighty tasty.
ME: Ha! Guess you can tell she doesn’t eat too many pecans or … pistachios either for that matter. We did make a few pie pops using a pecan pie filling that I whipped together, but I still need to finesse the ingredients on that one before I post a recipe.
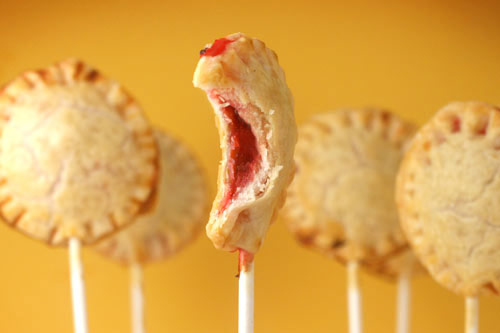
The pops baked in the oven on 375 for about 12-15 minutes or until the tops started to brown. Remove, cool and enjoy!
I thought I would love these more than I did. But… (and I can’t believe I’m saying these words) … They needed more fruit! A little too much pastry to pie filling for me. But still good, still fun to do and still super-cute!

Here are a few more of those stunning photographs from
Blackberry
Apple
Pumpkin
Tuesday, 16 August 2011
Cars2 - Not only Lightening McQueen!
I have done numerous Lightening McQueen cakepop orders for Cars2 birthday themes but this new one was a lot of fun because I had to make Mater, Luigi & Guido!


Sunday, 14 August 2011
Pink Marshmallow Pops
This is a wonderful and very easy recipe to make marshmallow treat pops from Hostess {with the Mostess}
Directions:

What you will need:
Marshmallows
Pink coloured chocolate
pink Smarties (or similar)
white nonpareils
lollipop sticks
white nonpareils
lollipop sticks
Directions:
1. Insert the lollipop sticks into the marshmallows & set aside.
2. Melt the chocolate in the microwave careful not to burn it.
3. Dip each marshmallow (with stick) into the melted chocolate, until about ½ of the marshmallow is coated.
4. Sprinkle with nonpareils and top with a pink Smartie while chocolate coating is still wet.
Enjoy!
Wednesday, 10 August 2011
How to Melt Chocolate
I found this incredibly helpful article on http://candy-recipes.blogspot.com/ . An awesome blog for anything related to yummy sweet stuff!
How to melt chocolate is a basic need-to-know for making cakepops.
Melting Chocolate
Melting chocolate is not the same as tempering chocolate, although melting is a necessary step in the tempering process. Melting chocolate can be accomplished in a microwave or over a hot-water bath. There are a few fundamental guidelines to successfully melting chocolate:
Make sure the chocolate is chopped into uniform pieces to ensure even melting. Never try to melt large bars or blocks of chocolate that have not been chopped.
Avoid all contact with water! Chocolate will seize and become unworkable if it comes into contact with even a few droplets of water. Make sure your bowls, workstation, and spatulas are completely dry.
Melt the chocolate slowly over low heat. Chocolate is very delicate and can become lumpy or grainy if overheated.
Stir the chocolate frequently with a rubber spatula, once the outer edges start to melt.
Chocolate retains its shape when melted, so the only way to know if it is truly melted is to stir it. Do not rely on appearances alone.
Melting Chocolate in the Microwave
The microwave is a great tool for melting chocolate. If used properly, it can melt chocolate more quickly than a double boiler with minimal effort and mess. The most critical part of melting chocolate in the microwave is choosing an appropriate container. Ideally, you want to melt your chocolate in a microwave-safe bowl that remains cool or only slightly warm after several minutes of near-continuous microwaving. If the bowl is too hot for you to handle after it has been microwaved, it is too hot for your chocolate. If you have overheated your chocolate, immediately pour it into a cool bowl add chunks of unmelted chocolate, and stir continuously.
It is preferable to melt your chocolate on a low (50%) power setting, to avoid scorching or burning it. If your microwave does not have this option, heat the chocolate in shorter intervals and stir between each bout of heat. Additionally, if your microwave does not have a turntable that rotates the bowl of chocolate, manually turn the bowl each time you stop and stir the chocolate.
It is very difficult to determine exact microwaving times, as it can vary depending on microwave wattage, quantity of chocolate, and even the cocoa butter content of the chocolate. However, as a rough guide, estimate about 1 minute for 1 ounce of chocolate, 3 minutes for 8 ounces of chocolate, 3.5 minutes for 1 pound of chocolate, and 4 minutes for 2 pounds. Run the microwave in 30 second-1 minute increments, stirring in between and rotating the bowl if necessary. Finish heating when most, but not all, of the chocolate is melted. Stir the chocolate continuously until it is smooth, shiny, and completely melted.
Melting Chocolate With a Double Boiler
The traditional method of melting chocolate is to use a double boiler. A double boiler is a specialized set of pans consisting of a saucepan that holds hot water, and a bowl that fits securely over the saucepan. Chocolate is placed in the top bowl and allowed to melt over gentle, indirect heat. If you don’t own a double boiler, any metal or glass bowl that fits snugly over the top of a saucepan can be used.
Begin by filling the saucepan with hot water from the tap. You want enough water to provide heat, but not so much that the bottom of the chocolate bowl touches the water. Heat the saucepan over low heat until it just begins to simmer, then turn off the stove and place the chocolate bowl over the water. If you are melting large amounts of chocolate, begin with 1/3 of your final quantity and melt in batches, waiting until the chocolate in the bowl is melted before adding more unmelted chunks. Let the chocolate begin to melt, and then stir it gently with a plastic spatula. When almost all of the chocolate is melted, life the top bowl from the saucepan and set it on the counter. Stir continuously until it is shiny, smooth, and completely melted.
Melting Chocolate With Liquids
Many recipes call for melting chocolate along with liquids like milk, cream, water, or liqueurs. Melting chocolate with liquids is often faster and more convenient, since it often speeds melting times and prevents common chocolate problems like overheating. However, there are a few things to keep in mind when melting chocolate with other substances.
Chocolate should never be melted with very small amounts of liquid. Always use at least 1 tablespoon of liquid for every 2 ounces of chocolate. This prevents the dry particles (cocoa and sugar) in the chocolate from binding together and becoming lumpy. Very dark chocolates may require more than this guideline, so be prepared to add another spoonful or two of liquid if necessary. When adding large quantities of liquid, add it all at once, rather than in small amounts, to prevent the chocolate from thickening.
Cold liquids should never be added to melted chocolate, as it can cause the chocolate to seize. Instead, ensure that your liquids are warm (but not boiling) when you add them to chocolate. Additionally, many recipes, like ganache, call for hot liquids to be poured over chopped chocolate. The heat from the liquid melts the chocolate, while the room temperature chocolate cools down the liquid. If you are following this method, allow the hot liquid and chocolate mixture to sit for a few minutes, then gently whisk them together until completely incorporated. Another useful tool for combining chocolate and hot liquids is an immersion blender. This handheld gadget does an excellent job of creating a smooth emulsion without incorporating air bubbles. Food processors, blenders, and electric mixers can also be used at low speeds.
Please go and check out Elizabeth Labau's blog http://candy-recipes.blogspot.com/ or join her at http://candy.about.com/ for candy recipes, tutorials and all candy-related yummy tidbits!
Monday, 8 August 2011
Oreo Cakepops

After seeing a recipe for Oreo cakepops recently, I decided to give it a go. They were delicious and my family had great fun devouring them!
Ingredients & Tools:
- Oreo cookies (any flavor)
- Chocolate or Candy Melts
- Lollipop sticks
- Cream cheese
- Wax paper
- Styroform block

For this recipe I chose the Milk Chocolate flavour. In South Africa, we only get one size box of Oreo's. It is a small box and ended up making 9 cakepops so if you would like more, add more boxes of Oreo's. Crumble up all the Oreo cookies in a mixer with 2 tablespoons of softened cream cheese.

It should be a nice play-dough consistency.

Roll the mixture into balls and place them on a baking sheet with wax paper on top. Put them in the fridge for 15 minutes to harden.

Grab a lollipop stick, dip it in the melted chocolate and stick it into the ball about halfway and then stick the cake pop into a polystyrene block or, here I used an egg carton, which is perfect for putting back into the fridge for the sticks to set.

Now your cakepops are ready for dipping. I dip them once and then let them dry, stuck into the polystyrene block and then I dip them again to get a really nice finish.

Before the second coat is fully dry, you can sprinkle whatever sprinkles you want. Here I used Brown Non-Pareils, Chocolate Vermicelli and Sugar crystals grounded with Chocolate Chips.

and all done!

Enjoy!

Subscribe to:
Comments (Atom)